Wednesday, December 10, 2014

You Don’t Have to Write PeopleCode to Create an XML / BI Publisher Report using PS Query - Part 4


Define the Report Definition


A Report Definition is where we tie the data source and the template files together. To define a Report Definition, navigate to Reporting Tools > BI Publisher > Report Definition and clink on Add New Value.

PS: A data source is automatically registered for you if you choose to use a Query or Connected Query data source that has not yet been registered. This would save you some time!

Provide a name for the report – HA_US001
Select PS Query from the Data Source Type list.
Select Data Source Id as HA_DEMO_XML that we created earlier.


These are the details we entered in the Definition page.


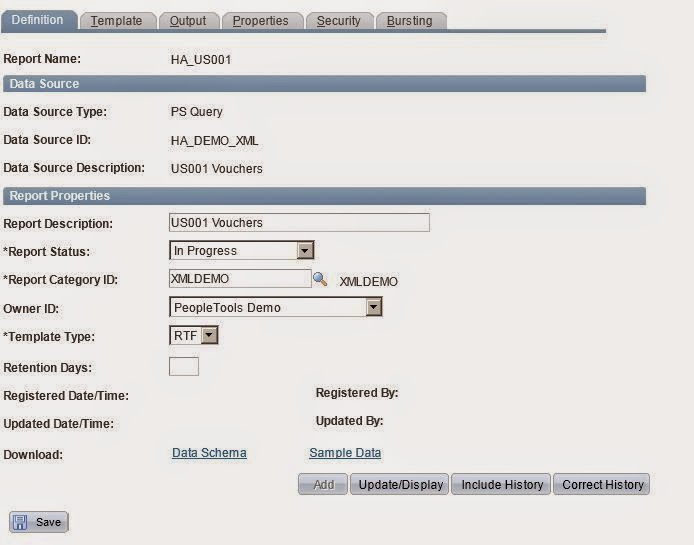
Note that the Report Status is Pending to begin with. After we are done with all the pages in this component, will we come back to this field and make it Active.
On the Output page, we just keep the pdf format enabled. You may want to keep other formats if that suits your requirement.

On the Security page, we add the PeopleSoft User role so that everyone with this role would be able to see the output of this report posted to the Report Manager.

Uploading and previewing an XMLP Template

The Template page allows you to have multiple templates and multiple template files per template. In our example, we just have one template and one template file (.rtf).


You Don’t Have to Write PeopleCode to Create an XML / BI Publisher Report using PS Query - Part 3


Create the Template

Now we will create a simple template using XML / BI Publisher design helper for MS Word.

Load XML Data

Before we start using the design helper, we need to have our sample xml data loaded into the tool. To do this, open Word and load the xml data file from the previous step as shown below.


Inport the XML/XSD File
Upon successfully loading the data, a message, like the one below, is shown.

Table Wizard

Now we will use the table wizard to insert a simple table into the template. The data that gets pulled from the query would finally be shown in this table.


Select Table and click Next.

Since we have only one repeating element (query/row), no selection needs to be done here. Click Next and continue.

Here we select the fields we want to display in our table. Use the button (>) to select the required ones and then click Finish.

In fact, if you keep pressing the Next button, you would be shown screens on which you can perform grouping of data and then sorting the data. We are not covering them here.
Now we will add some text to the template. How about a headline that says US001 Vouchers? You can insert logos or do any formatting supported by Word.
This is how our final template looks.

Preview the Template

Before we can preview the template, it should be saved as an RTF file. If you don’t do this, the system would prompt you to save once you click the preview menu.
So let’s save the file as Ha_us001.rtf
Now go to the Preview menu and click on PDF.

A pop-up window with the PDF file containing sample data opens.

If you are not happy with the preview, keep making changes.
Once done, save the template file and we are ready for the next step.

You Don’t Have to Write PeopleCode to Create an XML / BI Publisher Report using PS Query -Part 2


This is the second post in the XMLP tutorial series and will help you create your first simple XML Publisher report using Query as the data source.

Let’s get started.

Create a Data Source (Query)

As you saw in the getting started post, XML Publisher clearly separates the data extraction logic from data presentation. Data extraction is handled by the Data Source. In this tutorial, we will be using a PS Query as the data source – the source of data for our report.
Apart from PS Queries, XML Publisher also supports Connected Queries and XML files as data sources. We will see Connected Queries and XML files in future posts.
Now, we will quickly look at VOUCHERS of US001, a query I’d already created. It fetches few fields from the VOUCHER table. To keep things simple, I’ve specified a criteria to limit the Business Unit to US001 so that only Vouchers belonging to this BU get fetched. The SQL underlying the query is given below.


On running this query, you get the below output.


You can create your own query by navigating to Reporting Tools > Query > Query Manager and then clicking the Create New Query link. The query you create would be your data source.
Now that our query is ready, let’s go ahead and register it.

Register the Data Source

To register a data source, navigate to Reporting Tools > BI Publisher > Data Source and clink on Add New Value.

As mentioned earlier, PeopleSoft presently offers support for three data source types – Connected Query, PS Query and XML File. From this list of three, we will choose PS Query.
PS: Data source types Rowset and XMLDoc were deprecated in PeopleTools 8.50 . So you will not be able to add these data source types in newer versions. However, you can still view and edit the existing ones.
Data Source ID is the name of the query we created in the previous step – HA_DEMO_XML

Download the sample XML data file onto your desktop and save it HA_DEMO_XML.XML. In the next step, we will use this file for building our template using MS Word.